Lavish Decorated Strawberry Cheesecake – Elegant, Creamy, and Stunning
The first time I made a lavish decorated strawberry cheesecake, I remember stepping back and just staring at it for a moment. It felt less like a dessert and more like a piece of edible art. The smooth, creamy cheesecake base paired with glossy strawberries on top instantly made the whole kitchen feel special. This is the kind of dessert that slows you down, makes you smile, and reminds you why homemade treats feel so meaningful.
A lavish decorated strawberry cheesecake isn’t just about flavor—it’s about the experience. From the buttery crust to the rich, velvety filling and the beautifully arranged strawberries, every layer feels thoughtful and intentional. It’s perfect for celebrations, gatherings, or anytime you want to impress without saying a word.
❤️ Why You’ll Love This Lavish Decorated Strawberry Cheesecake
This lavish decorated strawberry cheesecake is pure elegance on a plate. The cheesecake itself is smooth, creamy, and lightly sweet, while the strawberries add freshness and a pop of natural flavor. Together, they create a balance that feels indulgent but never too heavy.
I love this recipe because it feels timeless. It works for birthdays, holidays, dinner parties, or even quiet weekends when you want to treat yourself. It’s beautiful enough to be the centerpiece of the table and comforting enough to make everyone feel at home.
🧂 Ingredients You’ll Need
- 2 cups graham cracker crumbs
- 1/2 cup melted butter
- 24 oz cream cheese, softened
- 1 cup granulated sugar
- 1 tsp vanilla extract
- 3 large eggs
- 1 cup sour cream
- 2 cups fresh strawberries, sliced
- 1/2 cup strawberry glaze or jam
🔧 Equipment You’ll Need
- Springform pan
- Mixing bowls
- Electric mixer
- Spatula
- Measuring cups and spoons
👩🍳 How to Make Lavish Decorated Strawberry Cheesecake
Making a lavish decorated strawberry cheesecake feels calming and rewarding. Each step brings you closer to a dessert that looks as good as it tastes.
1. Prepare the Crust
Mix graham cracker crumbs with melted butter until combined. Press the mixture firmly into the bottom of a springform pan and chill while preparing the filling.
2. Make the Cheesecake Filling
Beat the softened cream cheese until smooth and creamy. Add sugar and vanilla, mixing until well blended and silky.
3. Add Eggs and Sour Cream
Add eggs one at a time, mixing gently after each addition. Fold in sour cream until just combined, keeping the batter smooth.
4. Bake the Cheesecake
Pour the filling over the prepared crust. Bake at 325°F (165°C) for 55–65 minutes, until the center is slightly set but still jiggles.
5. Cool Completely
Turn off the oven and let the cheesecake cool slowly with the door slightly open. Refrigerate for at least 4 hours or overnight.
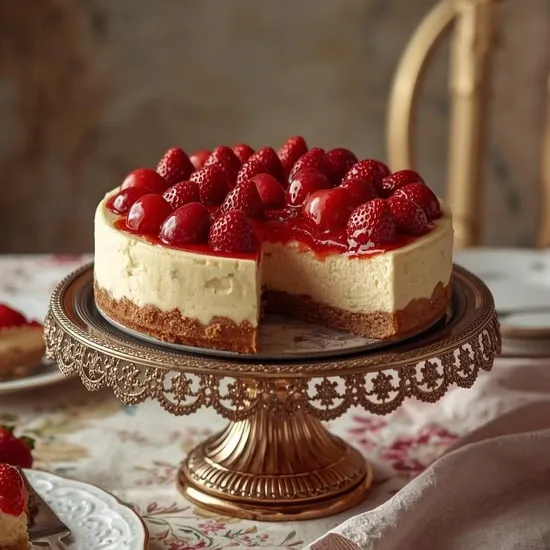
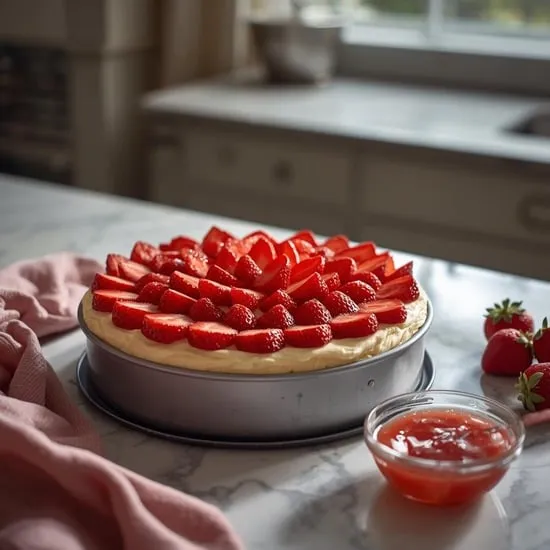
6. Decorate with Strawberries
Arrange sliced strawberries beautifully on top of the chilled cheesecake. Brush gently with strawberry glaze or warm jam for a glossy finish.

Lavish Decorated Strawberry Cheesecake
Equipment
- Springform Pan
- Mixing Bowls
- Electric Mixer
- Spatula
- Measuring Cups and Spoons
- Cooling Rack
Ingredients
Graham Cracker Crust
- 2 cups graham cracker crumbs
- 1/2 cup butter, melted
Cheesecake Filling
- 24 oz cream cheese, softened
- 1 cup granulated sugar
- 1 tsp vanilla extract
- 3 large eggs room temperature
- 1 cup sour cream
Strawberry Topping
- 2 cups fresh strawberries, sliced
- 1/2 cup strawberry glaze or strawberry jam warmed
Instructions
- Prepare the crust: Combine graham cracker crumbs and melted butter until evenly mixed. Press firmly into the bottom of a greased springform pan. Refrigerate while preparing the filling.
- Beat the cream cheese: In a large bowl, beat softened cream cheese until smooth, creamy, and free of lumps.
- Add sugar and vanilla: Mix in the granulated sugar and vanilla extract until fully incorporated and silky.
- Add eggs gently: Beat in the eggs one at a time on low speed, mixing just until combined after each addition.
- Fold in sour cream: Gently fold in the sour cream until the batter is smooth and creamy.
- Bake the cheesecake: Pour the filling over the crust and bake at 325°F (165°C) for 55–65 minutes, until the edges are set and the center slightly jiggles.
- Cool and chill: Turn off the oven and let the cheesecake cool with the door slightly open. Refrigerate for at least 4 hours or overnight.
- Decorate with strawberries: Arrange sliced strawberries on top of the chilled cheesecake and brush gently with warm strawberry glaze for a glossy finish.
💬 Why This Cheesecake Feels So Special
Lavish decorated strawberry cheesecake feels special because it’s made with care and attention. The smooth texture, fresh fruit, and elegant look make every slice feel like a celebration.
It’s the kind of dessert that invites compliments, quiet moments, and happy memories around the table.
💡 Tips to Make It Even Better
- Use ripe, bright red strawberries for the best look.
- Chill overnight for cleaner slices.
- Add whipped cream rosettes for extra elegance.
- Serve with fresh mint for color contrast.
🌟 Final Slice
This lavish decorated strawberry cheesecake is creamy, elegant, and unforgettable. It’s perfect when you want a dessert that feels luxurious yet comforting.
Once you serve it, it becomes a recipe everyone remembers.